For convenience, most operations on tracks can be performed directly from the Timeline.
Add/Import new track
Inserting a new track is straight forward and can be done in several ways.
Timeline
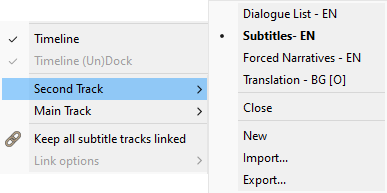
Probably the easiest way is to right click on the timeline and then select Second Track/New or Second Track/Import options:

Add new track from Timeline
Similar menu is displayed pressing the ![]() button at the upper left corner of the Timeline. Check Timeline drop-down menu as well.
button at the upper left corner of the Timeline. Check Timeline drop-down menu as well.
New item adds a new empty track with no subtitles. Import allows you to create a new track and load it's content from an existing file. In both cases, the track will immediately be displayed in the Preview list and the Timeline. These options are available for both Main and Second tracks.
Close option is available for Second Track only. It just hides the track, but does not remove it. If you want to remove the tracks from the project consider using File/Multiple Subtitle Tracks/Manage Subtitle Tracks menu.
Keyboard Shortcuts
All of the options described above are available as separate commands:
New second subtitles track |
Adds new, empty track as Secondary track. |
Import second subtitles track |
Imports a file as Secondary track. |
New main subtitles track |
Adds new, empty track as Main track. |
Import main subtitles track |
Imports a file as Main track. |
Please note, that there are no shortcuts assigned to these commands by default. You can always choose shortcuts for them from Tools/Customize/Commands.
Once a new track is added, it will be displayed in the Timeline:

Main track will always be displayed just above the the video thumbnail track, while the Second track will positioned above the main track. The currently selected track can easily be distinguished as it will always appear in blue.
You can also export the selected track directly from the Timeline using the pop-up menu described above. Select Export option and the standard Export subtitles dialog window will be displayed where you can choose and configure the file format and then select the file name.
Keyboard Shortcuts
In addition there are two commands that can be invoked directly using keyboard shortcuts:
Export main subtitles track |
Export the main tracks as a separate file. |
Export second subtitles track |
Export the second tracks as a separate file. |
Please note, that there are no shortcuts assigned to these commands by default. You can always choose shortcuts for them from Tools/Customize/Commands.
Switching between displayed tracks
Choosing which tracks are displayed could also be performed directly from the Timeline.
Again, the easiest way to switch the displayed tracks is by using the right click menu in the Timeline:
Similar menu is displayed pressing the ![]() button at the upper left corner of the Timeline. Check Timeline drop-down menu as well.
button at the upper left corner of the Timeline. Check Timeline drop-down menu as well.
All available tracks in the project will be listed there and the currently displayed track will be indicated in bold, as on the image above. Just click on a track and it will be selected.
Also the displayed tracks can be switched using File/Multiple Subtitle Tracks/Manage Subtitle Tracks menu.
Track settings
There is a gearbox button in the upper left corner of each track in the Timeline which is used to configure individual track settings. The following menu is displayed when you press the button:
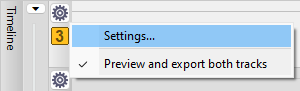
Click Settings.. and the following dialog box will be displayed:
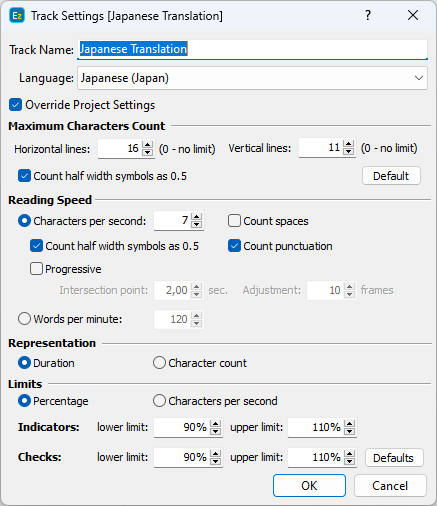
Here you can change the track name and language, and override certain Project Settings attributes.
In certain situations it is required that a track should have different Characters per Line and Reading Speed settings. For example, the screenshot above shows typical Japanese settings, which are quite different from typical English settings. Click Override Project Settings and configure the new options. They are used in Quality Control to Check Subtitles and Fix Subtitles and also affect the Error Indicators in Preview List.
Note that when you configure the track with Override Project Settings the corresponding track number icon on the timeline is highlighted: ![]()
Preview and export both tracks
This item allows you to quickly switch on/off Preview and export both tracks option.